반응형

1. 시험환경

    ˙ npm

    ˙ vue cli


2. 목적

    ˙ vue cli를 통해서 프로젝트 초기 설정하는 방법을 확인한다.

    ˙ 생성된 프로젝트를 실행하고 초기화면을 접속한다.


3. 적용

    ① vue cli 설치

        - 명령어 : npm install -g @vue/cli


    ② 프로젝트 생성하기 (프로젝트 폴더 생성한 곳에서 실행)

        - 명령어 : vue create .


     프로젝트를 실행한다.

        - 명령어 : npm run serve


    추가 플러그인 설치

        - npm install 명령어 : npm install vue-router --save

        - vue add 명령어 : vue add axios


4. 결과

    ˙ 초기화면 접속


반응형
반응형

1. 시험환경

    ˙ Android Studio

    ˙ Android Virtual Device


2. 목적

    ˙ BMI Calculator UI를 만들기 위해 Linear Layout 사용법을 학습한다.

    ˙ Code 기반으로 컴포넌트 사용법을 학습한다.


3. 적용

    ① BMI Calculator를 Android App으로 만들어 보자.

        - URL : https://www.calculator.net/bmi-calculator.html


BMI Calculator

BMI Calculator Result BMI = 20.1 kg/m2   (Normal) 161718.525303540UnderweightNormalOverweightObesityBMI = 20.1 Healthy BMI range: 18.5 kg/m2 - 25 kg/m2Healthy weight for the height: 59.9 kgs - 81.0 kgsPonderal Index: 11.1 kg/m3 The Body Mass Index (BMI) C

www.calculator.net


    ② Empty 프로젝트를 생성하고, Layout을 초기화한다.

        - layout 파일 : activity_main.xml


    ③ Constraints Layout을 Linear Layout으로 변경한다.

        - [Constraint Layout] 우클릭 → [Convert View...] → 팝업창 [LinearLayout] 클릭


    ④ Code탭에서 LinearLayout으로 변경된 것을 확인한다.

        - LinearLayout은 수평방향(horizontal) 또는 수직방향(vertical) 설정에 따라 순차적으로 컴포넌트가 배치된다.


    ⑤ LinearLayout에 컴포넌트를 배치 코드를 작성하고, 입력값을 받는 컴포넌트에 ID를 부여한다.

        - layout 파일 : activity_main.xml

        - Format 정렬 단축키 : <Ctrl> + <Alt> + <L>

1
2
3
4
5
6
7
8
9
10
11
12
13
14
15
16
17
18
19
20
21
22
23
24
25
26
27
28
29
30
31
32
33
34
35
36
37
38
39
40
41
42
43
44
45
46
47
48
49
50
51
52
53
54
55
56
57
58
59
60
61
62
63
64
65
66
67
68
69
70
71
72
73
74
75
76
77
78
79
80
81
82
83
84
85
86
87
88
89
90
91
92
93
94
<?xml version="1.0" encoding="utf-8"?>
<LinearLayout xmlns:android="http://schemas.android.com/apk/res/android"
    xmlns:app="http://schemas.android.com/apk/res-auto"
    xmlns:tools="http://schemas.android.com/tools"
    android:layout_width="match_parent"
    android:layout_height="match_parent"
    android:orientation="vertical"
    android:padding="16dp"
    tools:context=".MainActivity">
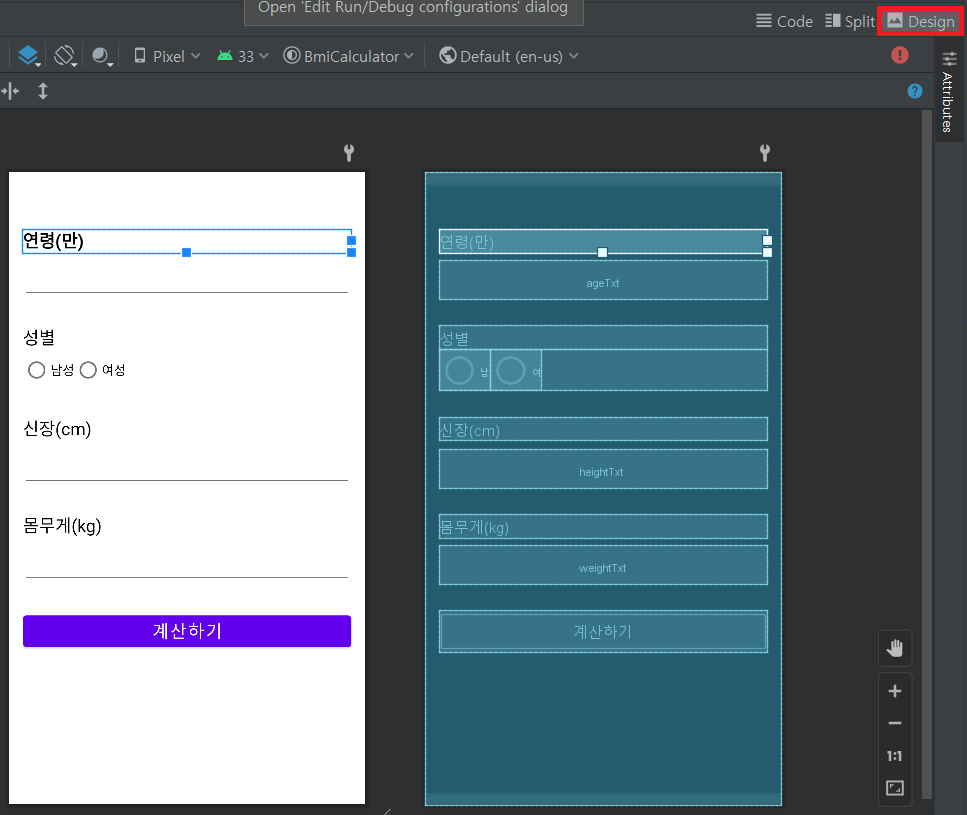
 
    <TextView
        android:layout_width="match_parent"
        android:layout_height="wrap_content"
        android:layout_marginTop="50dp"
        android:text="연령(만)"
        android:textColor="@color/black"
        android:textSize="20sp"
        android:textStyle="bold" />
 
    <EditText
        android:id="@+id/ageEditTxt"
        android:layout_width="match_parent"
        android:layout_height="wrap_content"
        android:layout_marginTop="10dp"
        android:inputType="number" />
 
    <TextView
        android:layout_width="match_parent"
        android:layout_height="wrap_content"
        android:layout_marginTop="30dp"
        android:text="성별"
        android:textColor="@color/black"
        android:textSize="20sp" />
 
    <RadioGroup
        android:id="@+id/genderRdo"
        android:layout_width="match_parent"
        android:layout_height="wrap_content"
        android:orientation="horizontal">
 
        <RadioButton
            android:id="@+id/maleRadio"
            android:layout_width="wrap_content"
            android:layout_height="wrap_content"
            android:text="남성"
            android:textSize="15sp" />
 
        <RadioButton
            android:id="@+id/femaleRadio"
            android:layout_width="wrap_content"
            android:layout_height="wrap_content"
            android:text="여성"
            android:textSize="15sp" />
    </RadioGroup>
 
    <TextView
        android:layout_width="match_parent"
        android:layout_height="wrap_content"
        android:layout_marginTop="30dp"
        android:inputType="numberDecimal"
        android:text="신장(cm)"
        android:textColor="@color/black"
        android:textSize="20sp" />
 
    <EditText
        android:id="@+id/heightEditTxt"
        android:layout_width="match_parent"
        android:layout_height="wrap_content"
        android:layout_marginTop="10dp"
        android:inputType="numberDecimal" />
 
    <TextView
        android:layout_width="match_parent"
        android:layout_height="wrap_content"
        android:layout_marginTop="30dp"
        android:text="몸무게(kg)"
        android:textColor="@color/black"
        android:textSize="20sp" />
 
    <EditText
        android:id="@+id/weightEditTxt"
        android:layout_width="match_parent"
        android:layout_height="wrap_content"
        android:layout_marginTop="10dp"
        android:inputType="numberDecimal" />
 
    <Button
        android:id="@+id/calculateBtn"
        android:layout_width="match_parent"
        android:layout_height="wrap_content"
        android:layout_marginTop="30dp"
        android:text="계산하기"
        android:textSize="20sp" />
</LinearLayout>
cs


4. 결과

    ˙ Design탭에서 배치된 컴포넌트를 확인한다.


※ 내용이 도움 되셨다면 광고 클릭 한번 부탁드립니다 ※

반응형
반응형

1. 시험환경

    ˙ JDK 17.0.5

    ˙ IntelliJ


2. 목적

    ˙ JAVA 코드를 이용하여 WGS84(lat, lng) 형식의 지점 간 거리 측정 코드를 작성한다.

    ˙ 구글지도에서 두 지점 간 거리 계산 기능과 작성한 코드를 비교하여 유효성을 확인한다.


3. 적용

    ① double로 정의된 두 지점 간 직선 거리를 계산하여 반환하는 메소드

        - lat1 : 지점1 위도

        - lon1 : 지점1 경도

        - lat2 : 지점2 위도

        - lon2 : 지점2 경도

1
2
3
4
5
6
7
8
9
10
11
12
13
14
15
16
17
18
19
20
public class Wgs84 {
 
    public double distance(double lat1, double lon1, double lat2, double lon2) {
        final int R = 6371// Radius of the earth
 
        Double latDistance = toRad(lat2 - lat1);
        Double lonDistance = toRad(lon2 - lon1);
        Double a = Math.sin(latDistance / 2* Math.sin(latDistance / 2+
                Math.cos(toRad(lat1)) * Math.cos(toRad(lat2)) *
                        Math.sin(lonDistance / 2* Math.sin(lonDistance / 2);
        Double c = 2 * Math.atan2(Math.sqrt(a), Math.sqrt(1-a));
 
        return R * c;
    }
 
    private static Double toRad(Double value) {
        return value * Math.PI / 180;
    }
}
 
cs


    ② Main 메소드에서 distance()를 호출한다.

1
2
3
4
5
6
7
8
9
10
public class Main {
    public static void main(String[] args) {
        double lat1 = 37.4857, lng1 = 127.1216;
        double lat2 = 37.5226, lng2 = 126.9051;
 
        Wgs84 wgs84 = new Wgs84();
        double dist = wgs84.distance(lat1, lng1, lat2, lng2);
        System.out.println(String.format("Distance = %f", dist));
    }
}
cs


    ③ 소스코드 다운로드

Example.zip
0.00MB


4. 결과

    ˙ 입력한 두 지점 간 거리는 구글지도에서 19.54km


    ˙ 콘솔 로그 확인 결과, 구글지도 수동입력 오차를 감안하면 쓸만한 코드임을 확인할 수 있다.

1
2
3
Distance = 19.533678
 
Process finished with exit code 0
cs


※ 내용이 도움 되셨다면 광고 클릭 한번 부탁드립니다 ※

반응형
반응형

1. 시험환경

    ˙ Jdk-17.0.5

    ˙ IntelliJ


2. 목적

    ˙ 특정 폴더 하위에 있는 모든 폴더를 순회하면서 파일을 삭제하는 코드를 작성한다.


3. 적용

    ① 테스트 대상 폴더 구조 및 임시 파일이 있다.

        - files : a.txt, b.txt

        - files\subFolder1 : c.txt, d.txt

        - files\subFolder1\subFolder2_1 폴더: e.txt

        - files\subFolder1\subFolder2_1 폴더: gf.txt, h.txt, i.txt


    ② 재귀함수를 호출하면서 하위 폴더에 있는 모든 파일을 File 클래스 내장 메소드를 이용하여 삭제한다. 

        - .isFile() : 파일 여부

        - .isDirectory() : 디렉토리 여부

        - .delete() : 삭제

1
2
3
4
5
6
7
8
9
10
11
12
13
14
15
16
17
18
19
20
21
22
import java.io.File;
 
public class FileControl {
    static void deleteFiles(String _targetDir) {
 
        File path = new File(_targetDir);
        File[] fList = path.listFiles();
 
        if (fList != null) {
            for(int i = 0; i < fList.length; i++) {
                if(fList[i].isFile()) {
                    fList[i].delete();
                    System.out.println(String.format("%s is deleted...", fList[i].getPath()));
                }
                else if(fList[i].isDirectory()) {
                    deleteFiles(fList[i].getPath());
                }
            }
        }
    }
}
 
cs


    ③ 대상 폴더를 지정하고 Main 클래스에서 테스트한다.

1
2
3
4
5
6
7
8
public class Main {
    private static String targetFolder = "D:/workspace-java/files";
 
    public static void main(String[] args) {
        FileControl fileControl = new FileControl();
        fileControl.deleteFiles(targetFolder);
    }
}
cs


    ④ 프로그램 코드

Example.zip
0.00MB


4. 결과

    ˙ 로그에서 삭제된 파일 목록을 확인한다.

1
2
3
4
5
6
7
8
9
10
11
D:\workspace-java\files\a.txt is deleted...
D:\workspace-java\files\b.txt is deleted...
D:\workspace-java\files\subFolder1\c.txt is deleted...
D:\workspace-java\files\subFolder1\d.txt is deleted...
D:\workspace-java\files\subFolder1\subFolder2_1\e.txt is deleted...
D:\workspace-java\files\subFolder1\subFolder2_2\f.txt is deleted...
D:\workspace-java\files\subFolder1\subFolder2_2\gf.txt is deleted...
D:\workspace-java\files\subFolder1\subFolder2_2\h.txt is deleted...
D:\workspace-java\files\subFolder1\subFolder2_2\i.txt is deleted...
 
Process finished with exit code 0
cs


※ 내용이 도움 되셨다면 광고 클릭 한번 부탁드립니다 ※

반응형
반응형

1. 시험환경

    ˙ Android Studio

    ˙ 갤럭시 S 단말기


2. 목적

    ˙ 단말기에 개발자 옵션 및 USB 디버깅 설정하는 방법을 확인한다.

    ˙ 안드로이드 스튜디오에서 만든 App을 테스트하기 위해 실제 단말기와 연결한다.


3. 적용

    ① [설정] → [휴대전화 정보] 터치


    ② [소프트웨어 정보] 터치


    ③ [빌드번호] 여러번 터치 → "개발자 모드를 켰습니다" 메시지 출력


    ④ [설정] → [개발자 옵션] 터치

        - ③절차에 의해 개발자 모드가 켜지면 항목이 나타난다.


    ⑤ [USB 디버깅] 터치 → [확인] 터치


4. 결과

    ˙ 단말기와 PC간 USB를 연결하고, 안드로이드 스튜디오에서 연결한 핸드폰이 나타나는 것을 확인한다.


※ 내용이 도움 되셨다면 광고 클릭 한번 부탁드립니다 ※

반응형
반응형

1. 시험환경

    ˙ Android Studio

    ˙ AVD(Android Virtual Device)

    ˙ Physical Device(삼성 갤럭시 S)


2. 목적

    ˙ 안드로이드 스튜디오에서 신규 프로젝트를 생성한다.

    ˙ 프로젝트를 AVD에 Import하고 결과를 확인한다.

    ˙ 프로젝트를 핸드폰 단말기에 Import하고 결과를 확인한다.


3. 적용

    ① Android Studio를 실행하고 "New Project" 버튼을 클릭한다.


    ② 프로젝트 템플릿을 선택하고, "Next" 버튼을 클릭한다.


    ③ 생성할 프로젝트를 설정하고, "Finish" 버튼을 클릭한다.

        - Name : 프로젝트 이름 입력
        - Pakcage name : 앱 구분을 위한 고유값 입력
        - Save location : 프로젝트 저장 위치 입력
        - Minimum SDK : 안드로이드 SDK 버전 설정. (전세계 사용자 디바이스 장치와 호환율 확인)


    ④ 프로젝트가 생성된다.


    ⑤ 프로젝트를 가상디바이스에 Import하기 위해 가상 디바이스 장치를 선택한다.

        - Virtual Device를 생성하는 방법은 아래 포스팅을 참고한다. (https://languagestory.tistory.com/175)


AVD(Android Virtual Device) 사용

1. 시험환경 ˙ Android Studio ˙ AVD(Android Virtual Device, 안드로이드 가상 디바이스) 2. 목적 ˙ Android Studio에서 제공하는 AVD를 최초 실행 및 동작하는 방법을 학습한다. 3. 적용 ① Android Studio → More Actions

languagestory.tistory.com


    ⑥ "Run" 단축 아이콘을 클릭하여 프로젝트를 선택한 장치에서 실행한다.


    ⑦ 프로젝트를 실제 디바이스에 Import하기 위해 PC와 USB로 연결된 핸드폰 장치를 선택한다.

        -  Physical Device를 생성하는 방법은 아래 포스팅을 참고한다. (https://languagestory.tistory.com/177)


    ⑧ "Run" 단축 아이콘을 클릭하여 프로젝트를 선택한 장치에서 실행한다.


4. 결과

    ˙ Virtual Device에서 실행한 화면을 확인하고, 화면을 클릭하여 조작한다.


    ˙ PC와 연결된 핸드폰에서 실행한 화면을 확인하고, 화면을 터치하여 조작한다.


※ 내용이 도움 되셨다면 광고 클릭 한번 부탁드립니다 ※

반응형
반응형

1. 시험환경

    ˙ Android Studio

    ˙ AVD(Android Virtual Device, 안드로이드 가상 디바이스)


2. 목적

    ˙ Android Studio에서 제공하는 AVD를 최초 실행 및 동작하는 방법을 학습한다.


3. 적용

    ① Android Studio → More Actions → Virtual Device Manager를 클릭한다.


    ② Default Device가 생성되어 있지만, 신규 디바이스를 만들기 위해 "Create device" 버튼을 클릭한다.


    ③ 가상 Device를 선택한다.


    가상 Device에 설치할 Android OS 이미지를 선택한다.

        - 기존에 다운받은 이미지가 아닌 경우, "Next" 버튼이 비활성화되어 있고 다운로드 아이콘을 클릭해야 한다.


    이미지 다운로드가 완료되면 "Next" 버튼이 활성화된다.


    ⑥ 디바이스 설정 후 "Finish" 버튼을 클릭한다.


4. 결과

    ˙ PC 환경에서 개발한 앱을 테스트할 수 있는 가상 디바이스 장치가 생성되었다.


※ 내용이 도움 되셨다면 광고 클릭 한번 부탁드립니다 ※

반응형
반응형

1. 시험환경

    ˙ 윈도우

    ˙ 안드로이드 스튜디오


2. 목적

    ˙ 윈도우 운영체제에서 안드로이드 스튜디오를 설치한다.


3. 적용

    ① 안드로이드 개발자 사이트에 접속해서 "Andriod 스튜디오" 메뉴를 클릭한다.

        - URL : https://developer.android.com/


    ② "Download Andriod Studio" 버튼을 클릭한다.


    ③ 팝업창에서 "동의" 버튼을 클릭하고 최신 제공 버전을 다운 받는다.


    ④ 다운 받은 설치파일을 실행하고, 단계별 설치 과정에서 "Next" 버튼을 클릭한다.

        - Android Virtual Device (체크) : 실제 핸드폰이 아닌 PC에서 가상의 안드로이드 폰을 이용하여 테스트한다.


    ⑤ Android Studio IDE 설치 과정이 완료되면 SDK 설치를 해야 한다.

        - Import Andriod Studio Settings : 기존 설정 파일이 있는 경우 Import 할 수 있다.


    ⑥ 설치한 Android Studio를 실행한다.


4. 결과

    ˙ More Actions → SDK Manager

    ˙ 설치된 SDK 버전을 확인한다. 체크박스 설정을 통해 SDK 하위 버전도 사용할 수 있다.


※ 내용이 도움 되셨다면 광고 클릭 한번 부탁드립니다 ※

반응형

+ Recent posts