1. 시험환경
˙ Github
˙ Ubuntu v20.04
˙ Docker, Docker Hub
˙ Spring Boot Project
2. 목적
˙ Github에서 Spring Boot Project를 다운로드(pull) 한다.
˙ Spring Boot Project가 정상적으로 빌드(build) 되어 결과 파일(war, jar)가 생성되는지 확인한다.
˙ build.gradle 파일에서 JIB 라이브러리 추가 및 JIB 영역을 작성한다.
˙ JIB을 이용하여 Spring Boot Project를 Docker Image 빌드 및 Docker Hub에 업로드(push) 한다.
˙ Docker Hub에서 다운로드(pull) 하고 컨테이너를 실행하여 동작여부를 확인한다.
3. 적용
① Spring Boot 프로젝트를 생성한다.
- Git Clone 명령어 : git clone [repository] .
- Repository : https://github.com/silkWater/template-gradle-springboot.git
GitHub - silkWater/template-gradle-springboot
Contribute to silkWater/template-gradle-springboot development by creating an account on GitHub.
github.com
② 프로젝트 빌드(Gradle) 명령어 실행 후 BUILD SUCCESSFUL 및 결과 파일이 생성된 것을 확인한다.
- JIB Build와 상관없이 해당 프로젝트의 빌드(Gradle Build)가 정상적으로 SUCCESS 되는지 확인하기 위한 단계이다.
- Gradle 빌드 명령어 : $ gradle build --info
- 빌드 파일 경로 : $ (pwd)/build/libs/[파일명].war

③ build.gradle 파일에서 JIB 라이브러리를 추가하고 빌드 명세(기존 Dockerfile 역활)를 작성한다.
- plugins 추가 : id 'com.google.cloud.tools.jib' version '3.1.4'
- 빌드 명세 작성 (기존 Dockerfile 역활) : jib { ... }
1
2
3
4
5
6
7
8
9
10
11
12
13
14
15
16
17
18
19
20
21
22
23
24
25
26
27
28
29
30
31
32
33
34
35
36
37
38
39
40
41
42
43
44
45
46
47
48
49
50
51
52
53
54
55
56
57
58
59
60
61
62
63
|
plugins {
id 'org.springframework.boot' version '2.7.1'
id 'io.spring.dependency-management' version '1.0.11.RELEASE'
id 'java'
id 'war'
id 'com.google.cloud.tools.jib' version '3.1.4'
}
group = 'com.boot.template'
version = '0.0.1-SNAPSHOT'
sourceCompatibility = '11'
configurations {
compileOnly {
extendsFrom annotationProcessor
}
}
repositories {
mavenCentral()
}
dependencies {
implementation 'org.springframework.boot:spring-boot-starter-web'
compileOnly 'org.projectlombok:lombok'
annotationProcessor 'org.projectlombok:lombok'
testImplementation 'org.springframework.boot:spring-boot-starter-test'
implementation 'javax.servlet:jstl'
implementation "org.apache.tomcat.embed:tomcat-embed-jasper"
}
tasks.named('test') {
useJUnitPlatform()
}
jib {
from {
image = 'adoptopenjdk/openjdk11:alpine-jre'
}
to {
image = 'silkwater/boot-template'
tags = ['1.0']
}
container {
entrypoint = ['java', '-Dspring.profiles.active=template', '-jar', 'template-0.0.1-SNAPSHOT.war']
// mainClass = 'com.test.StartApplication'
jvmFlags = ['-Xms512m', '-Xmx512m', '-Xdebug', '-XshowSettings:vm', '-XX:+UnlockExperimentalVMOptions', '-XX:+UseContainerSupport']
ports = ['8080']
environment = [SPRING_OUTPUT_ANSI_ENABLED: "ALWAYS"]
labels = [version:project.version, name:project.name, group:project.group]
creationTime = 'USE_CURRENT_TIMESTAMP'
format = 'Docker'
}
extraDirectories {
paths {
path {
from = file('build/libs')
}
}
}
}
|
cs |
④ Docker Hub에 업로드(push) 권한을 얻는다.
- $ docker login

⑤ JIB 명세에 의하여 Spring Boot 프로젝트를 docker image 빌드 및 정의된 Repository로 업로드(push) 한다.
- Gradle JIB 빌드 명령어 : $ ./gradlew jib

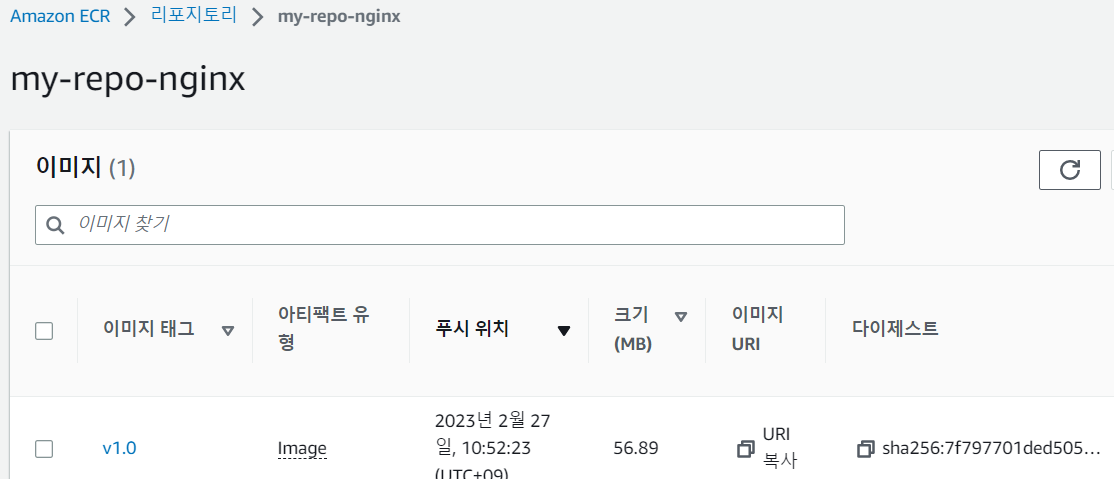
⑥ JIB(to)에서 지정한 Repository에 Docker Image가 업로드(push) 되었는지 확인한다.
- Docker Hub Repository 전/후 비교
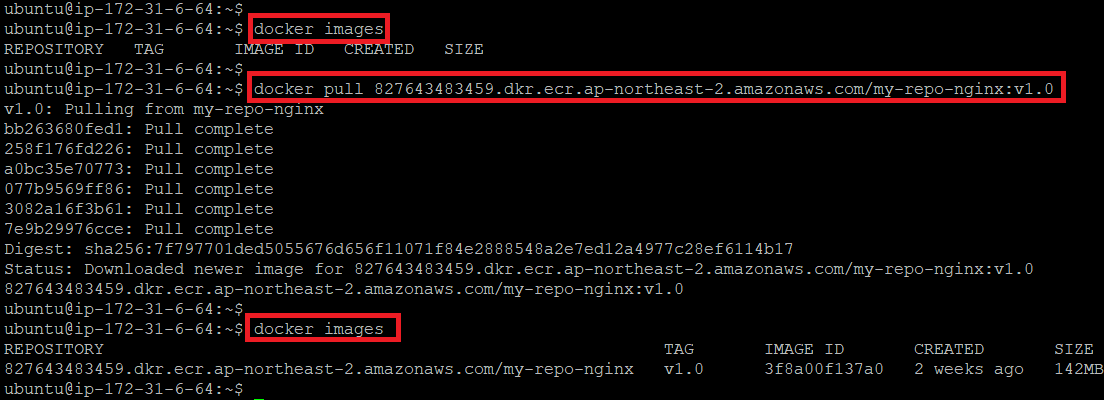
⑦ Docker Hub로부터 이미지를 다운로드(pull) 받아 실행한다.
- docker pull [repository]/[image]:[tag]

4. 결과
˙ HTTP 접속하여 서비스가 동작하는지 확인한다.