1. 시험환경
˙ 우분투(ubuntu) 리눅스 v22.04
˙ gradle v7
2. 목적
˙ Gradle 설치를 위한 필수 프로그램으로 JDK(v7 이상)를 설치해야 한다.
˙ 우분투(ubuntu) 리눅스 환경에서 gradle v7을 설치하자.
3. 적용
① JAVA 프로그램이 설치되어 있지 않은 경우, "JAVA 버전 확인" 명령어 입력 시 설치 명령어를 확인할 수 있다.
- JAVA 버전 확인 : $ java -v

② JRE가 설치되어 Gradle 설치를 위한 기본 준비가 되었음을 확인한다.

③ gradle repository가 설정되지 않은 환경에서 ubuntu v.22가 기본적으로 제공하는 버전은 4이다.
- 오류 개선 등의 이유로 version 7 이상 사용을 권장한다.

④ Ubuntu 리눅스에 PPA 저장소를 추가한다.
- $ sudo apt -y install vim apt-transport-https dirmngr wget softwareproperties-common
- $ sudo add-apt-repository ppa:cwchien/gradle

⑤ 패키지를 업데이트하고, 등록된 PPA에 의해서 Gradle을 설치한다.
- $ sudo sudo apt-get update
- $ sudo sudo apt -y install gradle

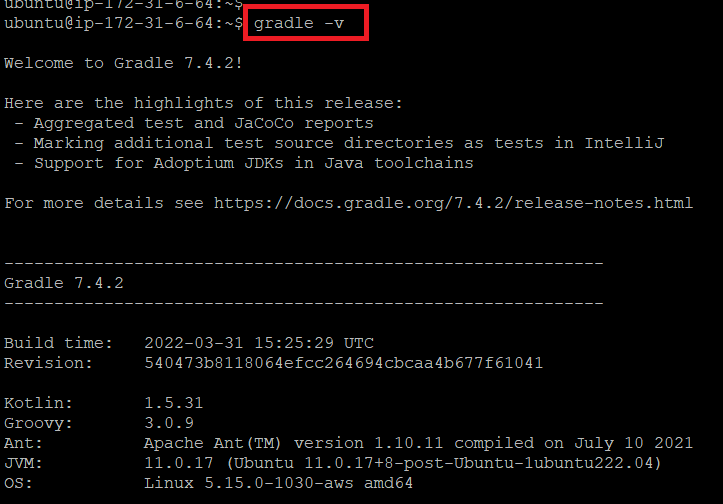
4. 결과
˙ Gradle ver.7 대역으로 설치된 것을 확인할 수 있다.
- $ gradle -v
'프로그램 설치' 카테고리의 다른 글
| cordova를 이용하여 웹(html, css, js)을 앱으로 빌드하기 (0) | 2023.04.16 |
|---|---|
| 윈도우(Windows 11) 환경에서 gradle v7 수동 설치하기 (0) | 2023.04.16 |
| GCP(Google Cloud Platform)을 이용한 Kubernetes 생성 (0) | 2023.03.07 |
| 도커(docker) 패키지 설치와 최신버전(feat.공식가이드) 설치 비교 (0) | 2023.03.07 |
| 우분투(ubuntu) 패키지(package) 업데이트 및 업그레이드 (0) | 2023.03.07 |